Showing posts with label quick and easy recipes. Show all posts

Secrets to Better Crockpot Cooking

Sunday, September 11, 2016

Secrets to better crockpot cooking. Join our 14 day Healthy Crockpot Creations challenge on Facebook Sept 12 - 26
Crockpot meals can be a lifesaver for busy parents. Throw a few ingredients into the pot in the morning and hit the on button and viola... the whole family has a hot, delicious meal waiting for them after school and work. Although slow cooker meals can be a great convenience, they can also be disappointing if they aren't prepared correctly. Here are some secrets to cooking no-fail crockpot meals:


  1. Use the right size slow cooker. Crockpots range from 1 - 8.5 quarts. Generally speaking, most recipes work best in a 4-6 quart cooker, but refer to your recipe or owner's manual for a suggested size to insure accurate cooking time.
  2. Don't overfill or underfill. Fill your crockpot between 1/2 and 2/3 with ingredients. More or less will affect cooking time.
  3. Keep the lid on. Removing the lid releases heat and slows down cooking time. Resist the urge to remove the lid until the final 45 minutes of cooking to check for doneness.
  4. Plan ahead. Keep in mind, most recipes require a minimum of 6 hours cooking time. The main reason we are using a crockpot is for convenience. Having ingredients on hand and prepared in advance will prevent mess in the kitchen and save you time when you need it most. 
  5. For added flavor, brown meats and saute vegetables in a pan first before adding them to the crockpot. Then, de-glaze the saute pan with some liquid like broth or wine, and add the juices to the crockpot for even more richness.
  6. Use the correct temperature for even cooking and to avoid safety hazards and bacteria setting in. Refer to the recipe or your owner's manual for temperature guidelines.
  7. Never add frozen ingredients straight from the freezer to the crockpot. Avoid bacteria by allowing them to thaw overnight in the refrigerator before adding them to the slow cooker. Pre-packaged freezer meals are safe to use frozen as long as you carefully follow the instructions on the package. 
  8. Trim fat from meat, and remove skin from poultry ahead of time to avoid a slimy, greasy meal.
  9. Layer foods properly. Place firm vegetables like potatoes, carrots and onions on the bottom and meats on top for even cooking. Place delicate vegetables in during the final 30 - 45 minutes of cooking so they remain firm.
  10. Add dairy during the last 15 minutes of cooking to prevent it from breaking down.
  11. Use caution when cooking with wine. Keeping the lid on the crockpot prevents the alcohol from evaporating. It's best to add it to the meats and vegetables as you brown them ahead of time, or use the wine to de-glaze the pan.
  12. Forget to turn on the crockpot? Don't take any chances. Letting meat and poultry set out a room temperature for an extended period of time can allow bacteria to set in.
  13. You can thicken the cooking juices by letting the lid off and setting the crockpot to high during the final hour of cooking.
  14. Save by purchasing less expensive cuts of meat at the grocery store. These cuts have more fat and are not as tender which makes them more suitable for slow cooking. Cook slow and low and you'll be pleased with the tender and flavorful outcome.
  15. Always brown ground meats first and drain them before placing in the crockpot.
  16. Add seafood during the final hour of cooking to prevent it from becoming too rubbery or breaking down.
  17. Save fresh herbs and cheeses for last. Cooking herbs for too lang can destroy their flavor and cheeses can break down if cooked too long. 
  18. To enhance flavor, squeeze some fresh lemon or lime juice, or add a small amount of vinegar to the pot at the very last minute.
Follow my blog with Bloglovin

Rock your Crock with us!!!

Our grilling days are almost gone. Time to dig out the crockpot and warm up to the idea of fall with tasty home-style cooking! But who's got time for that? Wouldn't it be great not to have to think about what to have for supper for one week? Even better, wouldn't it be great to just throw a bunch of ingredients together and come home to a delicious meal - no fuss, no muss! For two weeks, I'm going to help you with all that. I've decided to share my favorite quick & easy crockpot recipes in a FREE 14-day Healthy Crockpot Creations challenge! In week one, everyone gets a one week meal plan with recipes and grocery list. You also get tips and advice on how to make your slow cooker meals tastier and easier than ever. Simply follow along and find out how easy and affordable it is to eat healthy meals every day! Then in week two, we'll put our skills to the test and rock the crock all week long!

All participants will receive 21 new recipes to try - 7 breakfasts, 7 lunches and 7 dinners, all easily to prepare in a slow cooker. I'll also share healthy fall snack and beverage ideas. All recipes can be prepared in 20 minutes or less and contain only whole, natural ingredients. So not only are they a cinch to prepare, but they're healthy too!

https://www.facebook.com/groups/21DayFixSuperGroup/


Brenda

5 Minute Meal Plannning

Sunday, July 24, 2016

Quick and easy method for 21 day fix meal planning in less than 5 minutes by Brenda Ajay www.happyhealthysmart.blogspot.com

What's the #1 reason why people hate meal planning?
Yep... It takes too much time!


Meal planning is supposed to simplify your life. It's designed to save you time and money, not add to your frustration. Here's a really simple method that you can use to keep meal planning quick and easy.

Quick and easy method for 21 day fix meal planning in less than 5 minutes by Brenda Ajay www.happyhealthysmart.blogspot.com
I call this the P V C (protein - vegetable - carb) plan
Think of it this way, plan to have a protein (Red) a vegetable (Green) and a carb (Yellow) with every meal. Then fill in the blanks with what's left.
It should only take you 5 - 10 minutes to complete the meal plan.

**Ninja Tips:

  • To keep things super simple repeat the same breakfast, lunch and snacks every day of the week. Then you'll only have to prepare one meal each day!
  • Your dinners will be super simple. Pick a protein (chicken, fish, shrimp, turkey, lean red meat), add a vegetable, then add a carb (potato, sweet potato, rice or quinoa). It doesn't have to be fancy. 3 things - that's it!!!


Here's the process step-by-step:

1. Use the formula in your nutritional guide or click here to find your calorie target. I've chosen the 1500 - 1799 range. Once you know that target you can use the calorie chart to decide how many containers you are allowed to have each day.

Quick and easy method for 21 day fix meal planning in less than 5 minutes by Brenda Ajay www.happyhealthysmart.blogspot.com
2. Write your container break down on a piece of paper or use the 21 Day Fix tally sheets to track containers.

3. Use a piece of paper to make a meal chart. Label each meal and snack like this:
Breakfast:
Snack:
Lunch:
Snack:
Dinner:
Snack:

4. Assign contiainers to meals first by giving each meal a Red, Green and Yellow container
Breakfast: R - G - Y
Snack:
Lunch: R - G - Y
Snack:
Dinner: R - G - Y
Snack:

5. Cross those containers off your tally sheet and fill in the blanks with the containers that are left. That will leave you with a "formula" that you can use for every meal plan. Here's what my main formula looks like:
Breakfast: R - G - Y - P
Snack: R - P
Lunch: R - G - Y - P - O
Snack: G - B
Dinner: R - G - Y
Snack: P - tsp x 2

Once you have your main formula figured out you never have to do it again. Use it as a starting point and make adjustments if you need to. For example, my morning snack is almost always a Shakeology with berries and ice (Red - Purple), but occasionally I like to have a Shakeology with unsweetened almond milk and natural peanut butter.
Here's how I adjust for that day:
I take the yellow away from my lunch and use 2 tsp for peanut butter. My new lunch plan that day will be R - G - P - O, which could be a small summer berry chicken salad.

Sample 21 Day Fix 5-Minute Meal Plan

Quick and easy method for 21 day fix meal planning in less than 5 minutes by Brenda Ajay www.happyhealthysmart.blogspot.com


10 tips to keep it simple & successful:


Quick and easy method for 21 day fix meal planning in less than 5 minutes by Brenda Ajay www.happyhealthysmart.blogspot.com
    Quick and easy method for 21 day fix meal planning in less than 5 minutes by Brenda Ajay www.happyhealthysmart.blogspot.com
  1. Repeat the same breakfast, lunch, and snacks every day. Then you only have to prepare one meal!
  2. Make one of your meals or snacks a Shakeology. In one scoop you'll have perfect nutrition without even thinking about it. At $4 a serving, that's a bargain compared to what you'd spend if you were buying breakfast or lunch out.
  3. Use Team Beachbody's free account to access quick and easy recipes. Click here to set up a new FREE account with me as your coach
  4. When you find a recipe that you like or that's a big hit with your family, keep it on file so it's easy to find in the future. Keep a "family favorites" folder with meal plans and recipes the whole family likes. Or use Pinterest and create a board called "favorite recipes" separate from your main recipe board for only those recipes that you ave tried and liked.
  5. Network with other busy moms and share ideas. Create a Facebook recipe exchange group. Make it a public group so anyone can join in. Click here to join our 21 Day Fix Friends Recipes exchange group
  6. Create theme nights like Pasta night, Taco Tuesday, Sandwich night, Meatless Monday, etc
  7. Eat leftovers. Or use them to make a new dish. For example, when I make roasted vegetable, I always make more than enough. The leftovers are perfect for Pasta Prima Vera the next day. Just mix them with some pasta, extra virgin olive oil and garlic.
  8. Search Pinterest or Google images for "21 day fix meal plans" and you'll find hundreds of meal plans that you can use.
  9. Clean, cut and prep foods ahead of time. Spending that extra hour to wash, slice and prepare food when you get home from the grocery store might seem like a lot of work but trust me it will save you time in the long run. Wash and slice produce, hard boil some eggs, make a large batch of plain rice or quinoa, grill some chicken and portion some snack foods like grapes and cheese, almonds, hummus, etc so that they will be ready to go and you can just reach for them when it's time to eat or cook dinner. Another advantage to prepping food, you won't believe how much space this will save in your fridge!!!
  10. Make a grocery list and stick to it. Make sure you have everything you need, ready to go and on-hand to make cooking a much quicker and less frustrating experience.

Ready to give 21 Day Fix a try but not sure where to start? Join our next 21 Day Fix Challenge Group and let's FIX it together step-by-step! Joining is easy, start by answering a few questions:


Use Wufoo integrations and get your data to your favorite apps.


Brenda

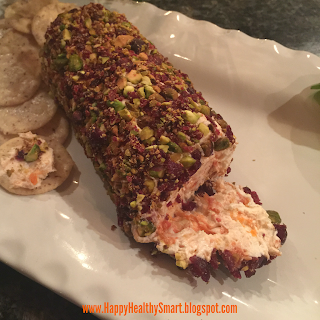
Smoked Salmon & Goat Cheese Log

Wednesday, December 16, 2015

Appetizers, healthy appetizers, holiday recipes, Christmas party recipes, Smoked salmon and goat cheese log, salmon recipes, gluten free, hanukkah recipes, party food, quick and easy recipes, Brenda Ajay, 21 day fix recipes

Ingredients:

8 oz Thin sliced smoked salmon (chopped)
8 oz Fresh plain goat cheese
1 tsp fresh dill
Juice of 1 lemon
salt & pepper to taste
1/4 cup pistachios, shelled and chopped
1/4 cup dried cranberries (craisins), chopped

Preparation:


  1. Place chopped salmon, goat cheese, dill, lemon juice and salt and pepper in a bowl and mix until well blended.
  2. Remove mixture from the bowl and using your hands form it into the shape of a log
  3. Mix chopped pistachios and cranberries together in a plate and roll the log over nuts and berries until it is completely coated.
  4. Wrap in plastic and refrigerate for at least 1 hour before serving
  5. Serve with crackers, thin sliced pumpernickel bread or tortilla chips


Brenda

6 Steps to the Perfect Mason Jar Salad

Sunday, November 15, 2015


6 steps to the perfect mason jar salad
photo courtesy of My Fitness Pal blog
Are you a jar junkie? Mason jars have become the Tupperware of the 21st century. The same jars that our grandmothers used for canning, pickling and storing freshly grown foods in the pantry, today have become all the rage in meal prep. We're talking about mason jar salads. In just a few minutes you can pack a few salads that will serve as lunch for the whole week. They are quick and easy to assemble, convenient to grab-and-go for lunch, they don't leak and they look as good as they taste. The secret to success with mason jar salads is in the layering. Pack your salad in the wrong order and you can end up with a soggy, mushy mess. Here are some tips to packing a mason jar salad that will stay fresh for up to 5 days in the fridge: 
6 steps to the perfect mason jar salad
photo courtesy of thetwobiteclub.com
  1. Add the dressing first. Sounds backwards, I know, but keeping the wet ingredients at the bottom of the jar will keep the fresh ingredients from getting soggy and mushy.
  2. Next, place ingredients that will be enhanced by the flavor of the dressing. Think of the dressing as a marinade. I like to place things like onions, chick peas, beans, and artichokes next because they will soak up the flavor of the dressing without losing their texture. An added plus, the dressing will help to dilute the strong taste of onions. 
  3. Next add a base layer that won’t soak up the dressing. Try vegetables like carrots, cherry tomatoes, red and green peppers, celery and sugar snap peas; or some protein like chicken, turkey, cubed deli meats or cooked shrimp.
  4. Keep layering with ingredients that you enjoy. There are no wrong combinations! Pack the ingredients as tightly as possible. The less air that’s between your layers, the longer the salad will stay fresh.
  5. Use your salad greens as the final layer. If you like to add cheese or nuts, then sprinkle those on top of the greens.
  6. Twist on the tops, place in the fridge and you’re all set. When you’re ready to enjoy your Mason jar salad, just pour it out into a bowl and toss.
Want to learn more about meal prep and planning? Wondering how to fight disease with food and fitness? Why not join an online fitness and nutrition accountability group. Find out how some simple lifestyle changes can help you look and feel better at any age. It's fun and easy to join. Simply answer a few questions below and I will get back to you within 24 hours.


There are tons of Wufoo features to help make your forms awesome.

Brenda

Chocolate Peanut Butter Shakeology Ice Cream

Thursday, August 13, 2015


Chocolate and peanut butter ice cream that’s good for you? Believe it. This is the ice cream you’ve been waiting for. It has only 4 ingredients, and takes less than 10 minutes to make, plus freezing time. Quick and easy, gluten free, paleo

Chocolate and peanut butter ice cream that’s good for you? Believe it. This is the ice cream you’ve been waiting for. It has only 4 ingredients, and takes less than 10 minutes to make, plus freezing time.

Total Time: 4 hrs. 10 min.
Prep Time: 10 min.
Cooking Time: None
Yield: 2 servings

Ingredients:

1 medium banana, cut into chunks
½ cup unsweetened almond milk
2 scoops Chocolate Shakeology
2 Tbsp. all-natural smooth peanut butter

Preparation:

1. Place banana in plastic bag; freeze for 4 hours, or until completely frozen.
2. Place almond milk, bananas, Shakeology, and peanut butter in blender (or food processor); cover. Blend until smooth.
3. Serve immediately.

Want more tasty clean eating recipes CLICK HERE


These recipes are great but are you ready for more?
Want to get SERIOUS, get FIT and FEEL GREAT....FOREVER?
Get results with an online accountability group. Fill out this application for more information


There are tons of Wufoo features to help make your forms awesome.
Brenda